Introduction
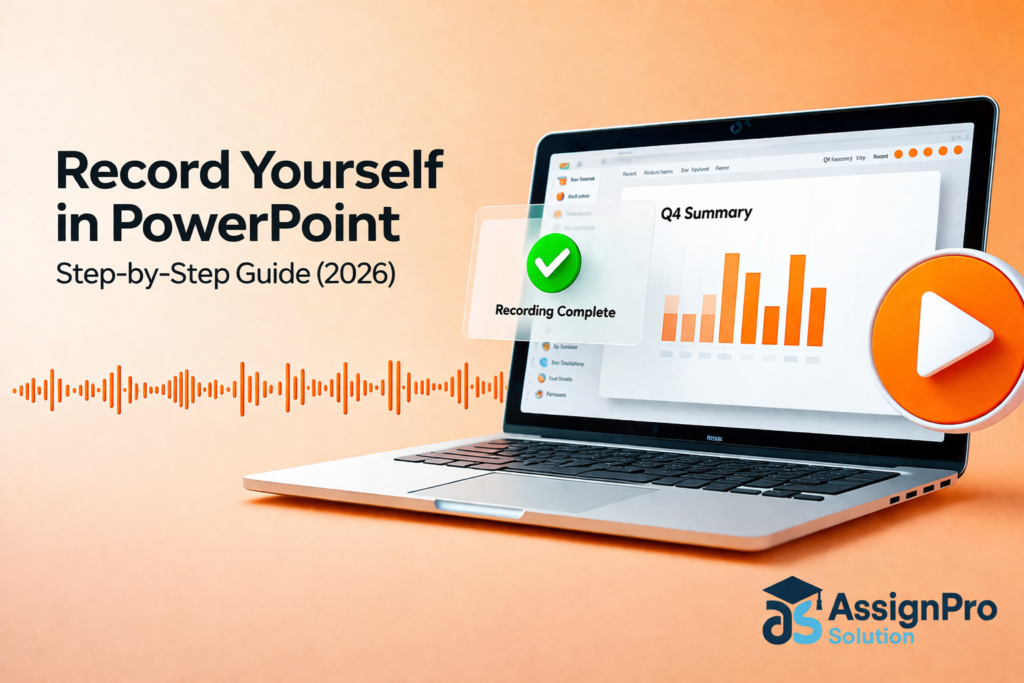
Picture this: Your professor just assigned a video presentation due in 48 hours. You’ve got your slides ready. But now you’re staring at your screen wondering how to record yourself in PowerPoint without looking like a complete amateur.
Sound familiar?
Whether you’re studying in the UK, Australia, Canada, Germany, or anywhere else, video presentations have become a standard university requirement. From recorded lectures to assessed presentations, knowing how to record yourself in PowerPoint is no longer optional — it’s essential.
The good news? PowerPoint has a built-in recording feature that captures your face, voice, and slides simultaneously. No expensive software needed. No complicated editing required.
This 2026 guide walks you through exactlyhow to record yourself in PowerPoint— from setup to submission. You’ll learn the step-by-step process for Windows 11 and Mac, discover how to troubleshoot common errors, and pick up professional tips that make your recordings stand out.
By the end, you’ll record video presentations with confidence. Let’s get started.
Definition Box: Recording yourself in PowerPoint means capturing your webcam video and audio while presenting your slides — all within PowerPoint’s built-in Record feature. This creates a professional video presentation without needing any external software.
Table of Contents
- Why University Students Struggle to Record Themselves in PowerPoint
- What You Need Before You Start
- How to Record Yourself in PowerPoint — Step by Step (Windows 11)
- How to Record Yourself in PowerPoint on Mac
- How to Record PowerPoint With Webcam and Slide at Same Time
- Common Errors When Recording in PowerPoint — And How to Fix Them
- How to Export and Submit Your PowerPoint Recording
- Tips to Look and Sound Professional on Camera
- Frequently Asked Questions
Why University Students Struggle to Record Themselves in PowerPoint
Most students don’t struggle because recording is hard. They struggle because nobody taught them the basics.
Here’s what typically goes wrong:
- They can’t find the Record tab — Many students use outdated PowerPoint versions or don’t know where Microsoft hid the recording feature.
- Their webcam doesn’t appear — Privacy settings, driver issues, or simple toggle mistakes block the camera feed.
- Audio sounds terrible or doesn’t record at all — Microphone permissions and input settings trip up even tech-savvy students.
- They don’t know how to add themselves to PowerPoint presentation — The webcam overlay feature isn’t obvious without guidance.
- File sizes explode — Students record high-resolution videos that exceed university submission limits.
These problems waste hours. Students who structure their university assignments properly often neglect presentation planning entirely.
The solution? Follow a proven process. That’s exactly what this guide provides.
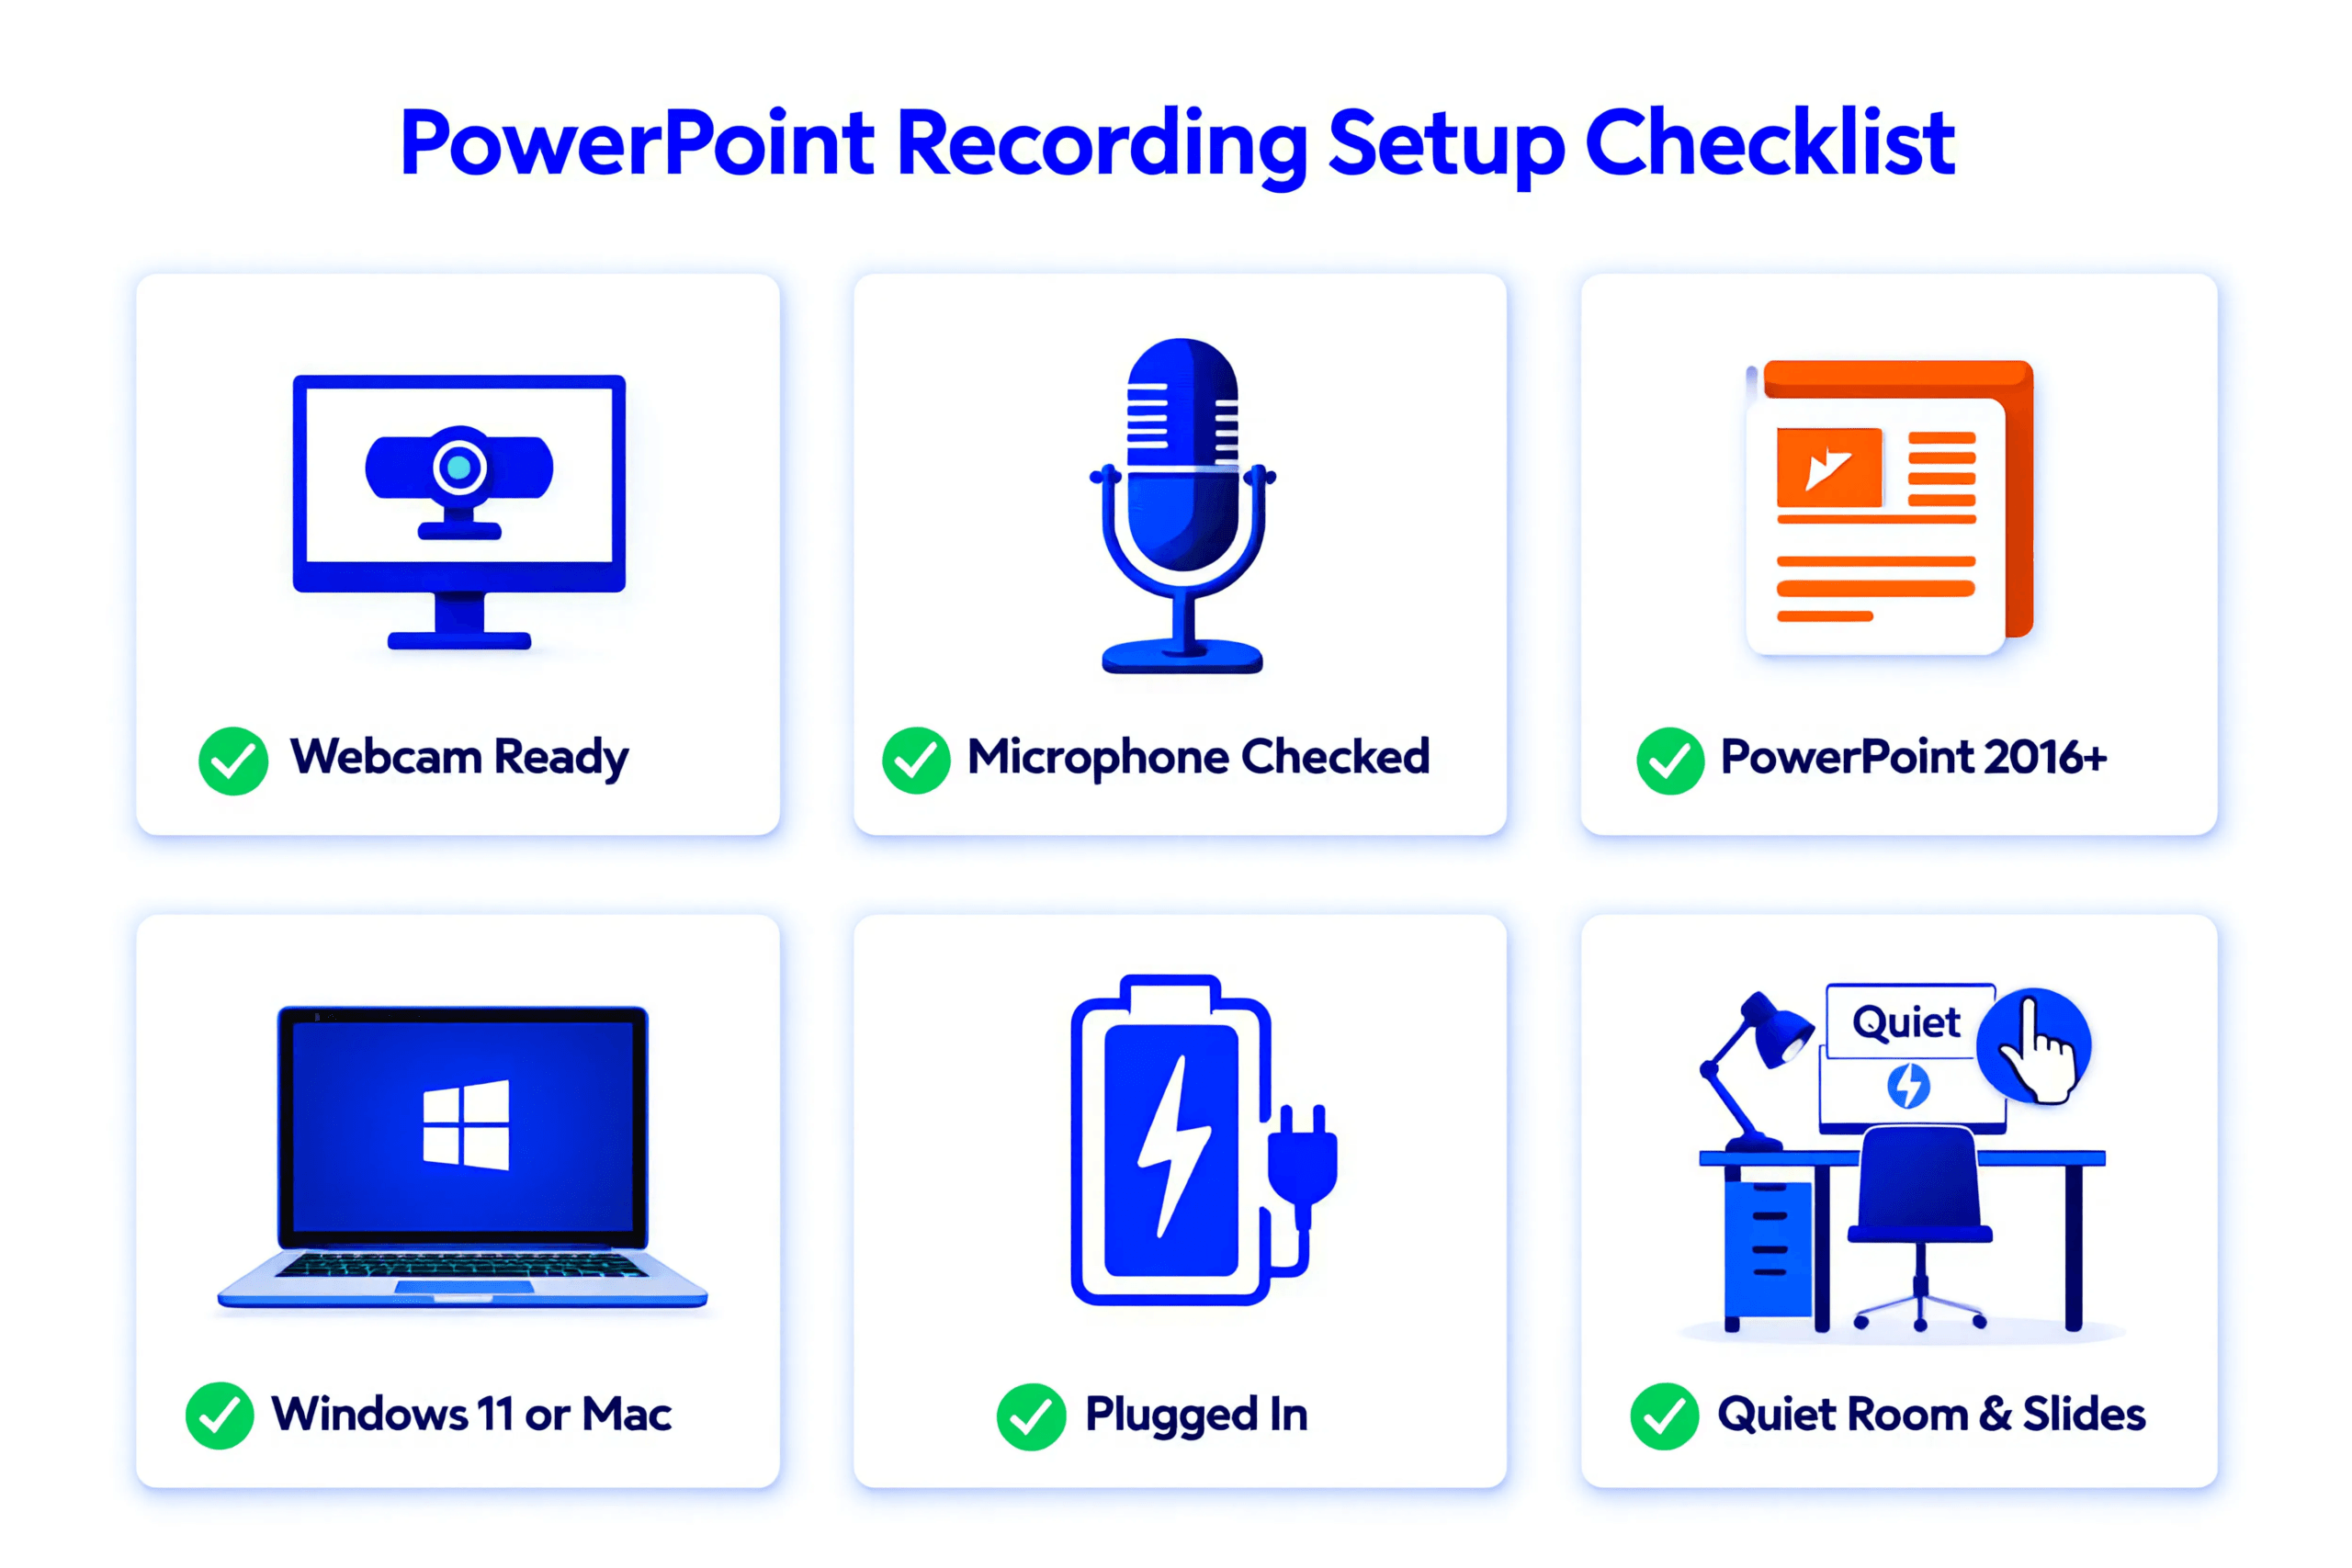
What You Need Before You Start
Before you learn how to record yourself in PowerPoint, gather these essentials. Missing even one item creates problems mid-recording.
Hardware Requirements
- Webcam — Built-in laptop cameras work fine. External USB webcams offer better quality.
- Microphone — Your laptop’s built-in mic works for basic recordings. USB microphones or headset mics dramatically improve audio clarity.
- Stable surface — Shaky cameras look unprofessional. Use a laptop stand or steady desk setup.
Software Requirements
- Microsoft PowerPoint 2016 or later — The Record feature requires PowerPoint 2016, 2019, 2021, or Microsoft 365. Older versions lack webcam integration.
- Windows 10/11 or macOS — Both operating systems support PowerPoint recording with webcam.
- Updated drivers — Ensure your webcam and microphone drivers are current.
Pre-Recording Checklist
- Close unnecessary programs (they slow your computer)
- Plug in your laptop (recording drains battery fast)
- Check internet connection (OneDrive auto-save needs it)
- Test webcam in another app first
- Verify microphone input levels
How to Record Yourself in PowerPoint — Step by Step (Windows 11)
This section teaches you exactly how to record yourself in PowerPoint on Windows 11. Follow each numbered step precisely for best results.
These instructions work for PowerPoint 2021 and Microsoft 365. Minor interface differences exist in older versions.
Step 1: Open Microsoft PowerPoint
Launch PowerPoint from your Start menu or desktop shortcut. Wait for the application to fully load before proceeding.
If PowerPoint opens slowly, close other programs consuming memory.
Step 2: Create or Open Your Presentation
Click “Open” to load an existing presentation, or select “New” to create fresh slides.
For university presentations, your slides should already be complete before recording. Don’t build slides and record simultaneously.
Ensure your presentation is saved before recording begins.
Step 3: Click the Record Tab
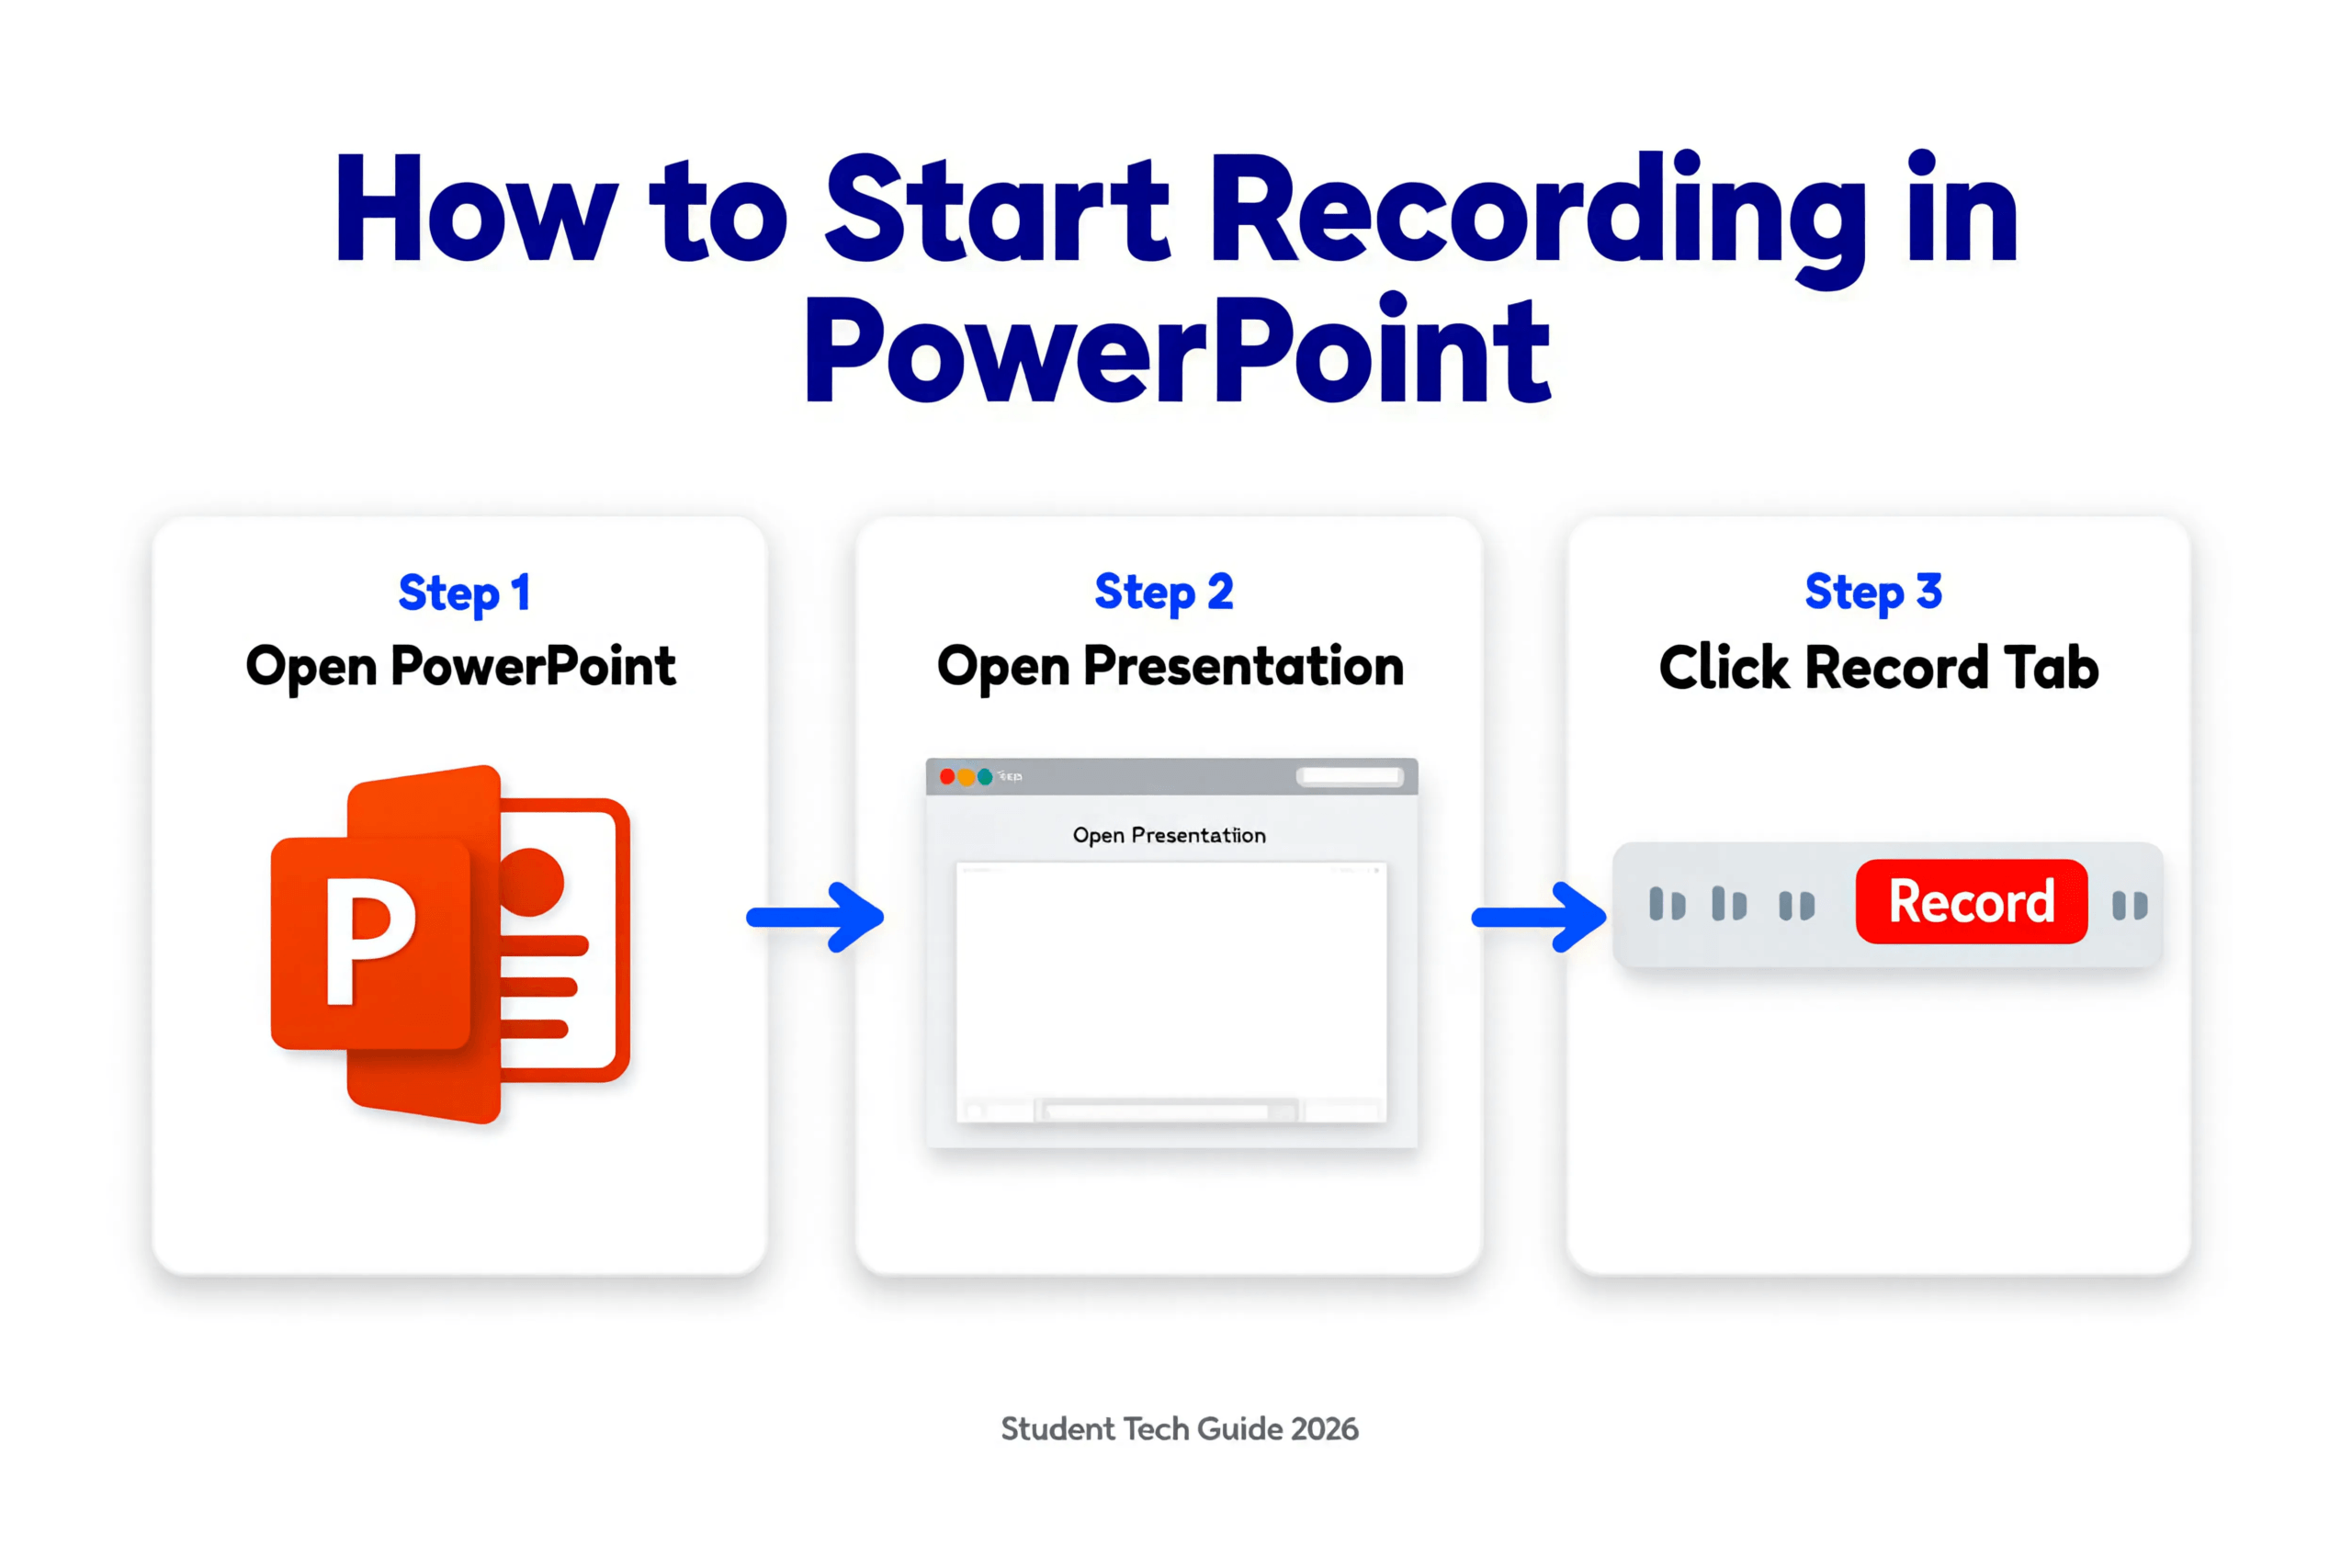
Look at the top ribbon menu. Click the “Record” tab.
This tab contains all tools needed to record yourself in PowerPoint with webcam and audio.
Warning: If you don’t see the Record tab, your PowerPoint version may be outdated. Check our troubleshooting section below.
Step 4: Click the Record Button
Inside the Record tab, you’ll see a large “Record” button (or “Record Slide Show” in some versions).
Click it. PowerPoint opens the recording interface.
This full-screen mode shows your slides with recording controls.
Step 5: Check Your Webcam Preview
Look for the webcam preview window. It typically appears in the bottom-right corner of your screen.
You should see yourself on camera. If your face appears, the webcam is working correctly.
If no preview appears, your camera may be disabled. Click the camera icon to toggle it on.
Step 6: Test Your Microphone
Before recording, verify your microphone works.
Click the microphone icon in the recording toolbar. Some versions show audio level meters — speak normally and watch for movement.
If levels don’t move, your mic input isn’t detected. Check your system sound settings.
Warning: Recording without testing audio first is the #1 mistake students make. Always test before important recordings.
Step 7: Toggle Camera and Microphone ON
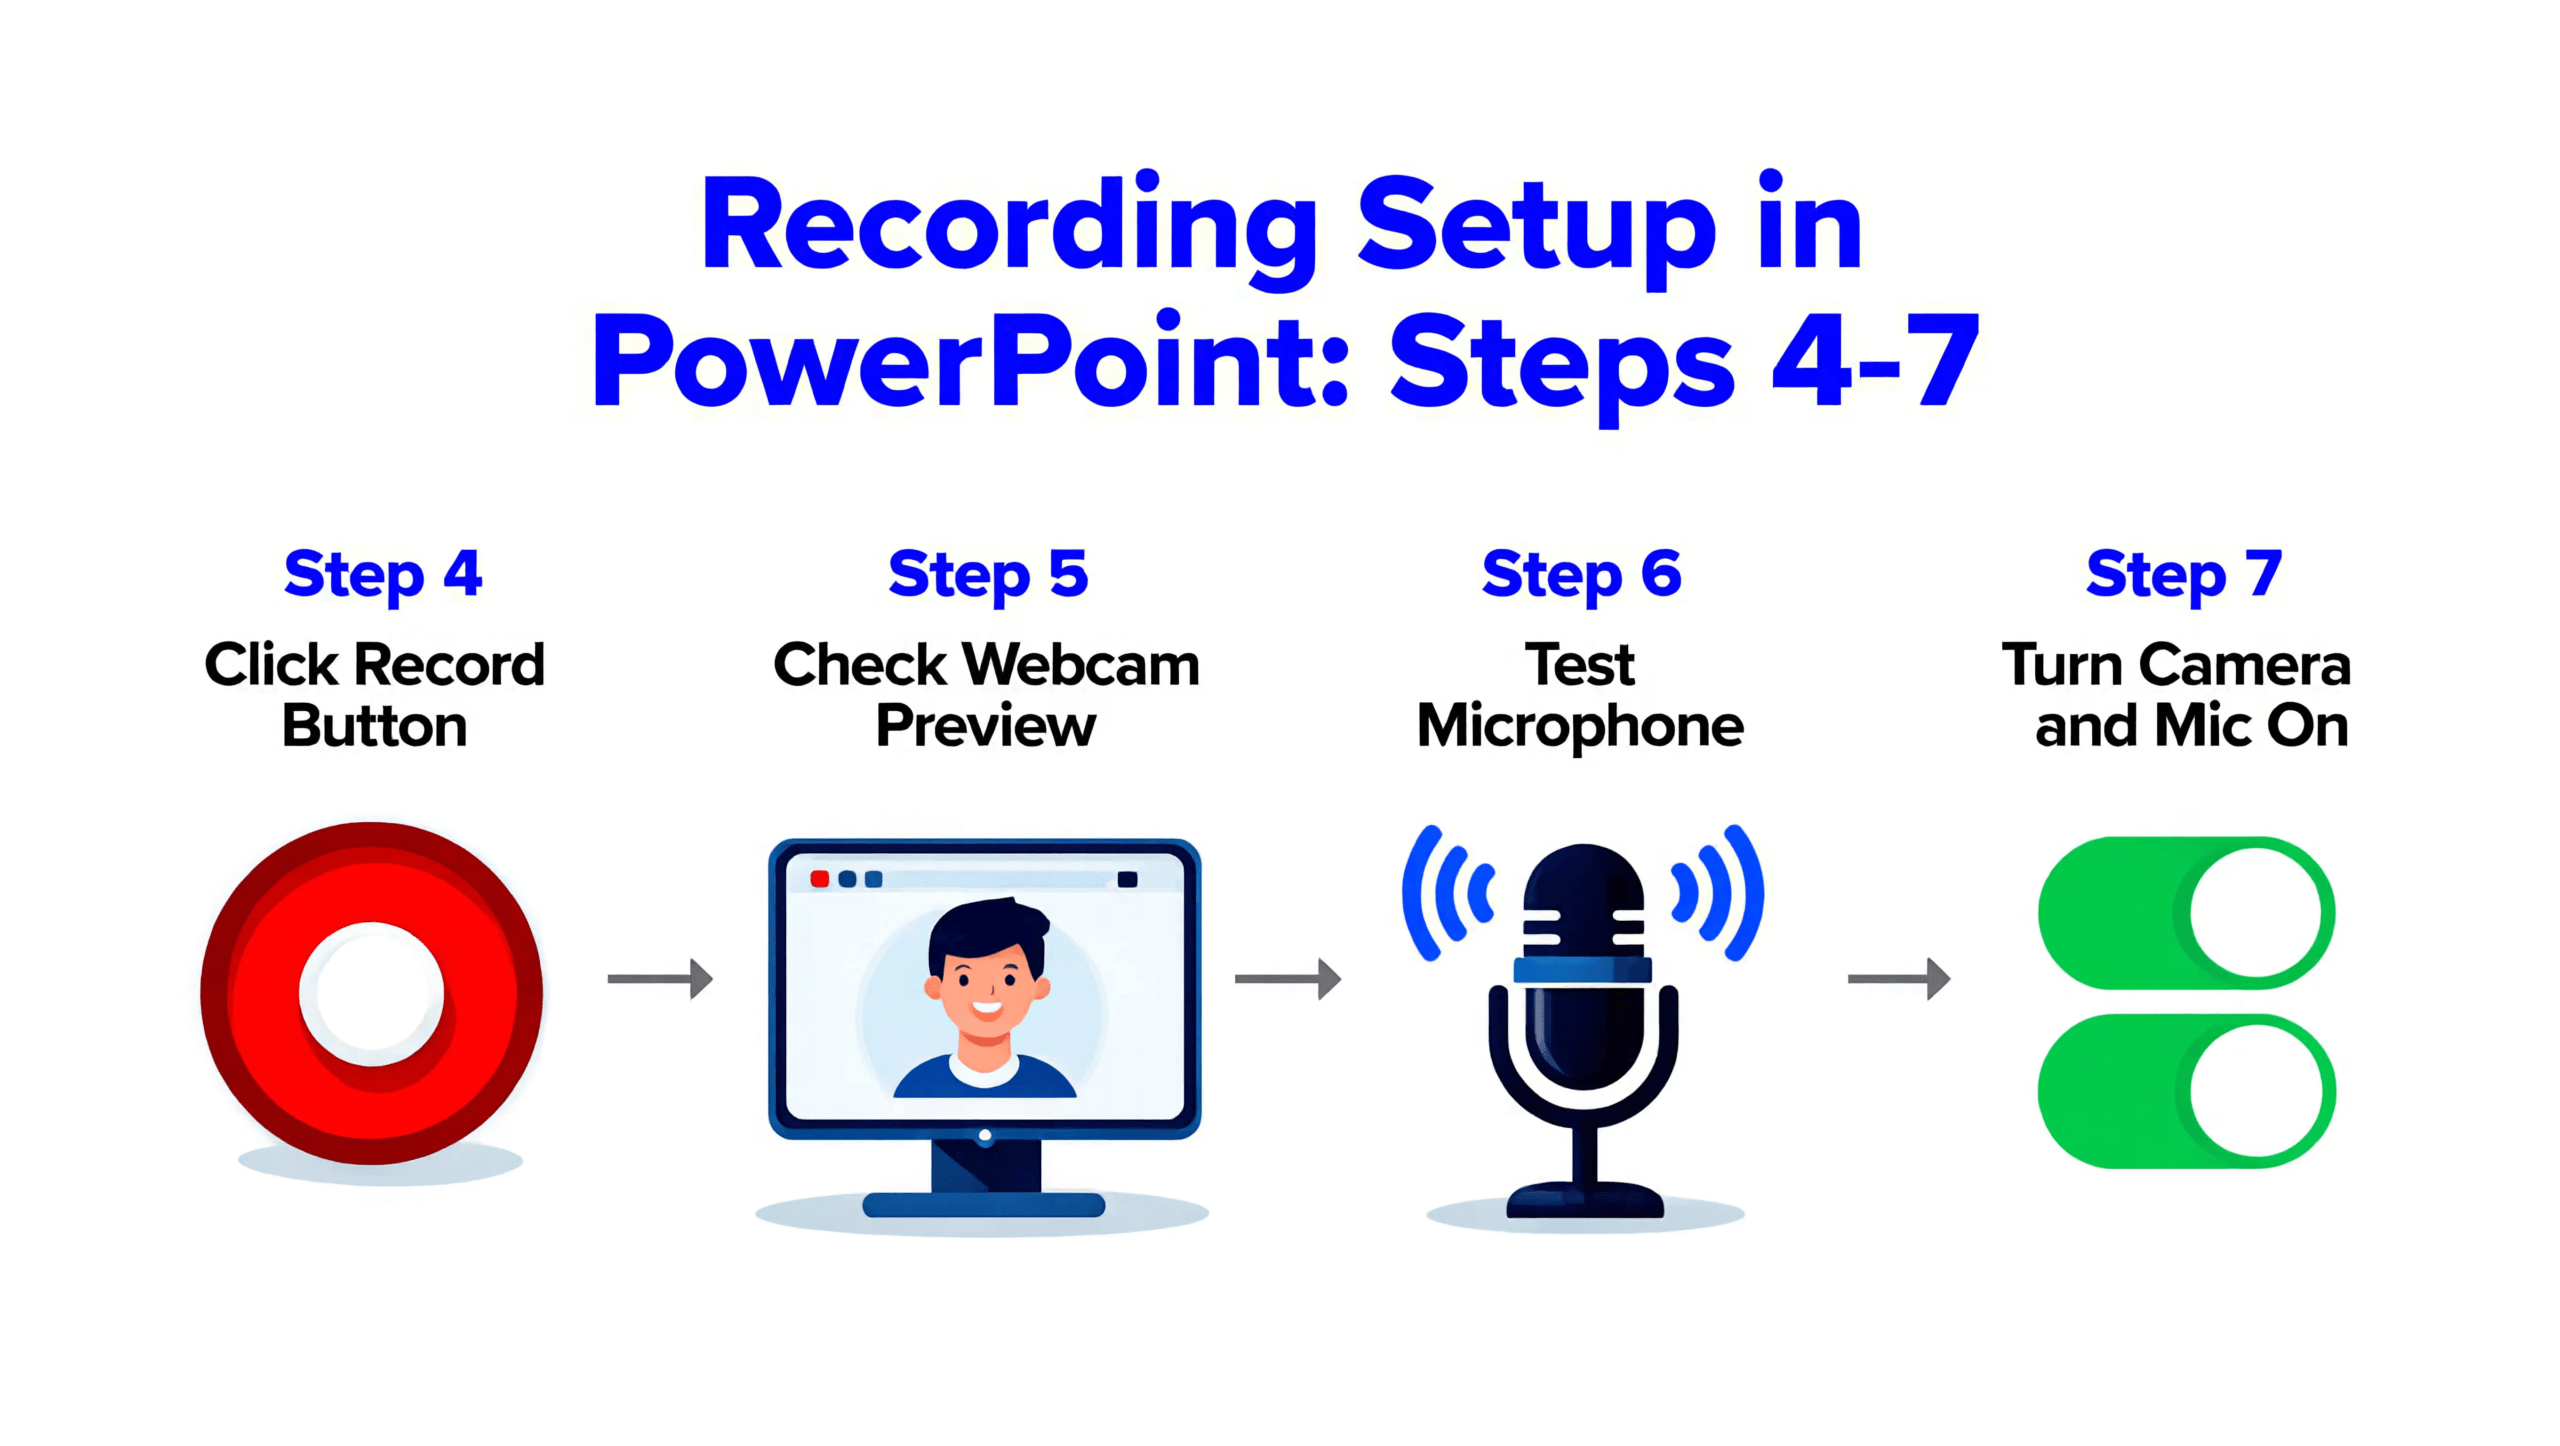
Ensure both camera and microphone icons show as enabled (not crossed out).
The webcam icon controls your video feed. The microphone icon controls audio recording.
Both must be active to record yourself in PowerPoint with webcam and audio simultaneously.
Step 8: Position Your Recording Window
Drag the webcam preview to your preferred corner. Most presenters place it bottom-right.
Resize the preview window if needed. Make it large enough to see clearly but small enough to avoid blocking important slide content.
Your position affects how professional the final recording looks.
Step 9: Click the Red Record Button
Ready? Take a breath. Click the red circular Record button.
PowerPoint counts down: 3… 2… 1…
Recording begins automatically after the countdown.
Step 10: Speak and Present Your Slides
Now you’re recording. Present naturally.
Look at your camera (not your screen) for better eye contact. Speak clearly at a moderate pace.
Use arrow keys or click to advance slides. PowerPoint captures everything — your voice, your face, your slide transitions.
Pro Tip: If you make a mistake, don’t stop. Pause, take a breath, and continue. Minor errors feel worse than they look.
Step 11: Stop Recording
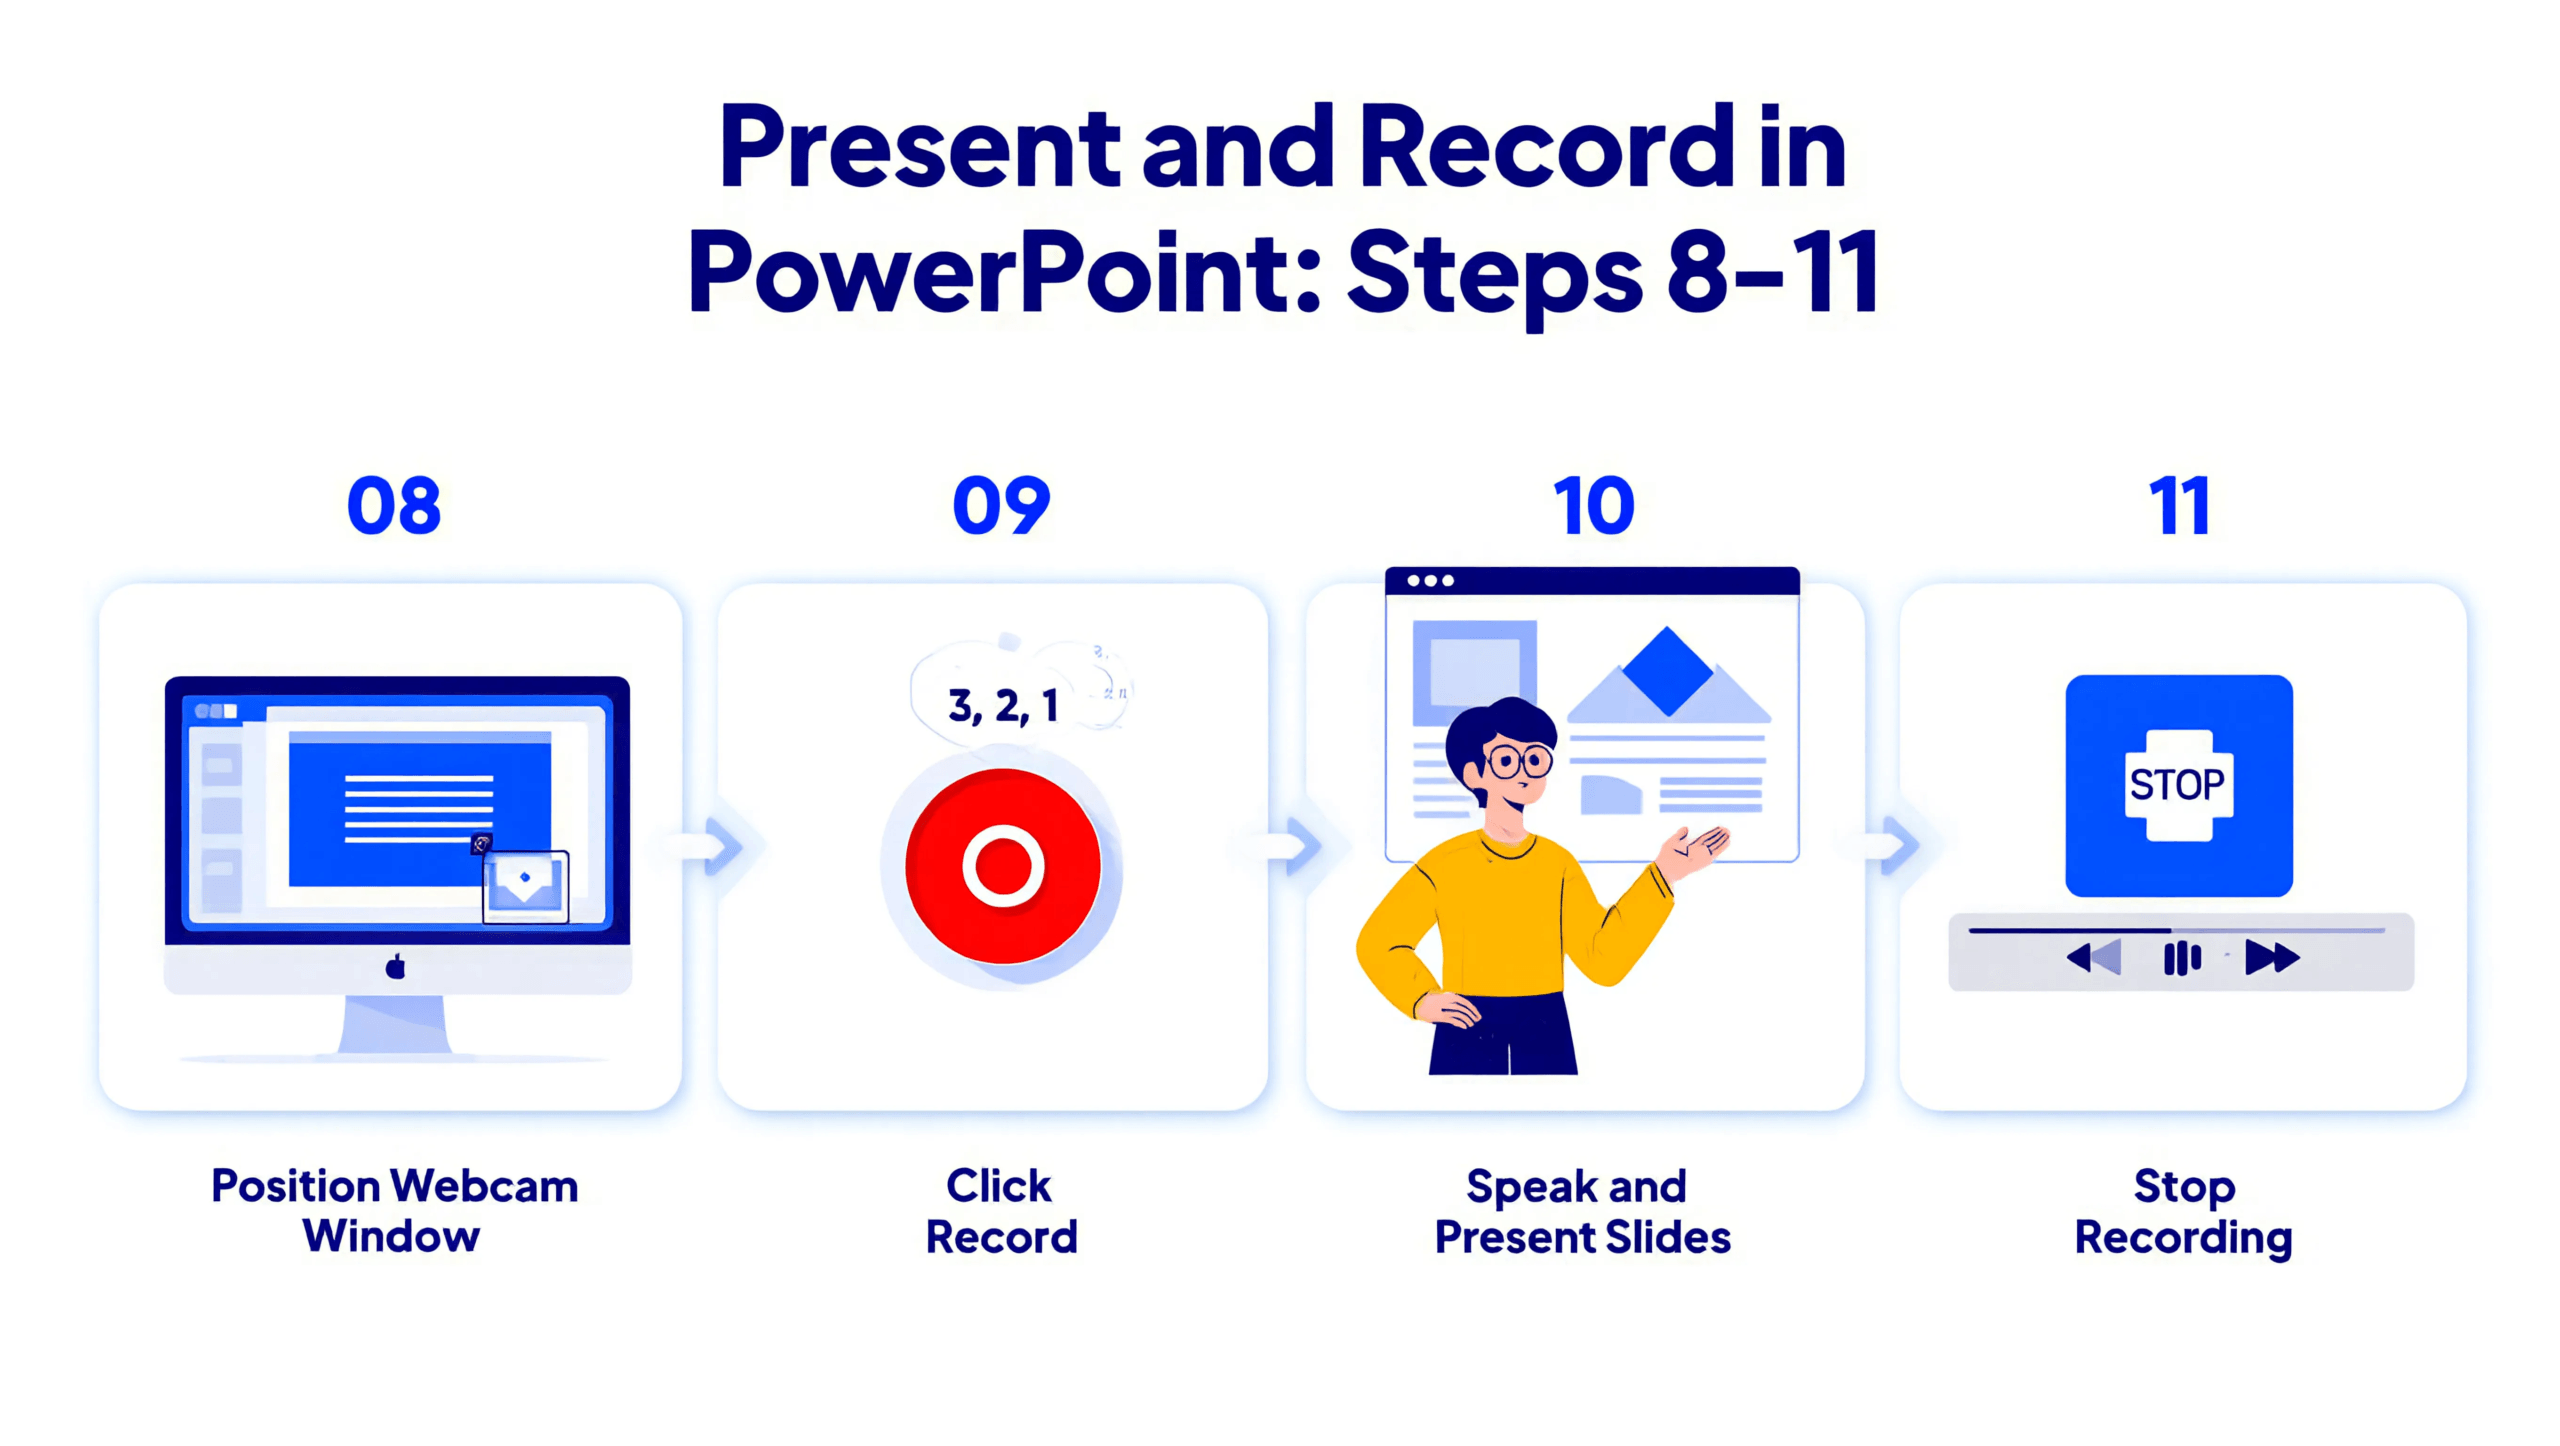
When finished, click the Stop button (square icon).
Recording ends immediately. Your video is saved to the current slide.
Don’t close PowerPoint yet — you haven’t saved the complete recording.
Step 12: Review Your Recording
Click “Replay” or press Play to watch your recording.
Check audio quality, video clarity, and slide timing. Note any sections that need re-recording.
You can re-record individual slides without redoing the entire presentation.
Step 13: Save Your Recording
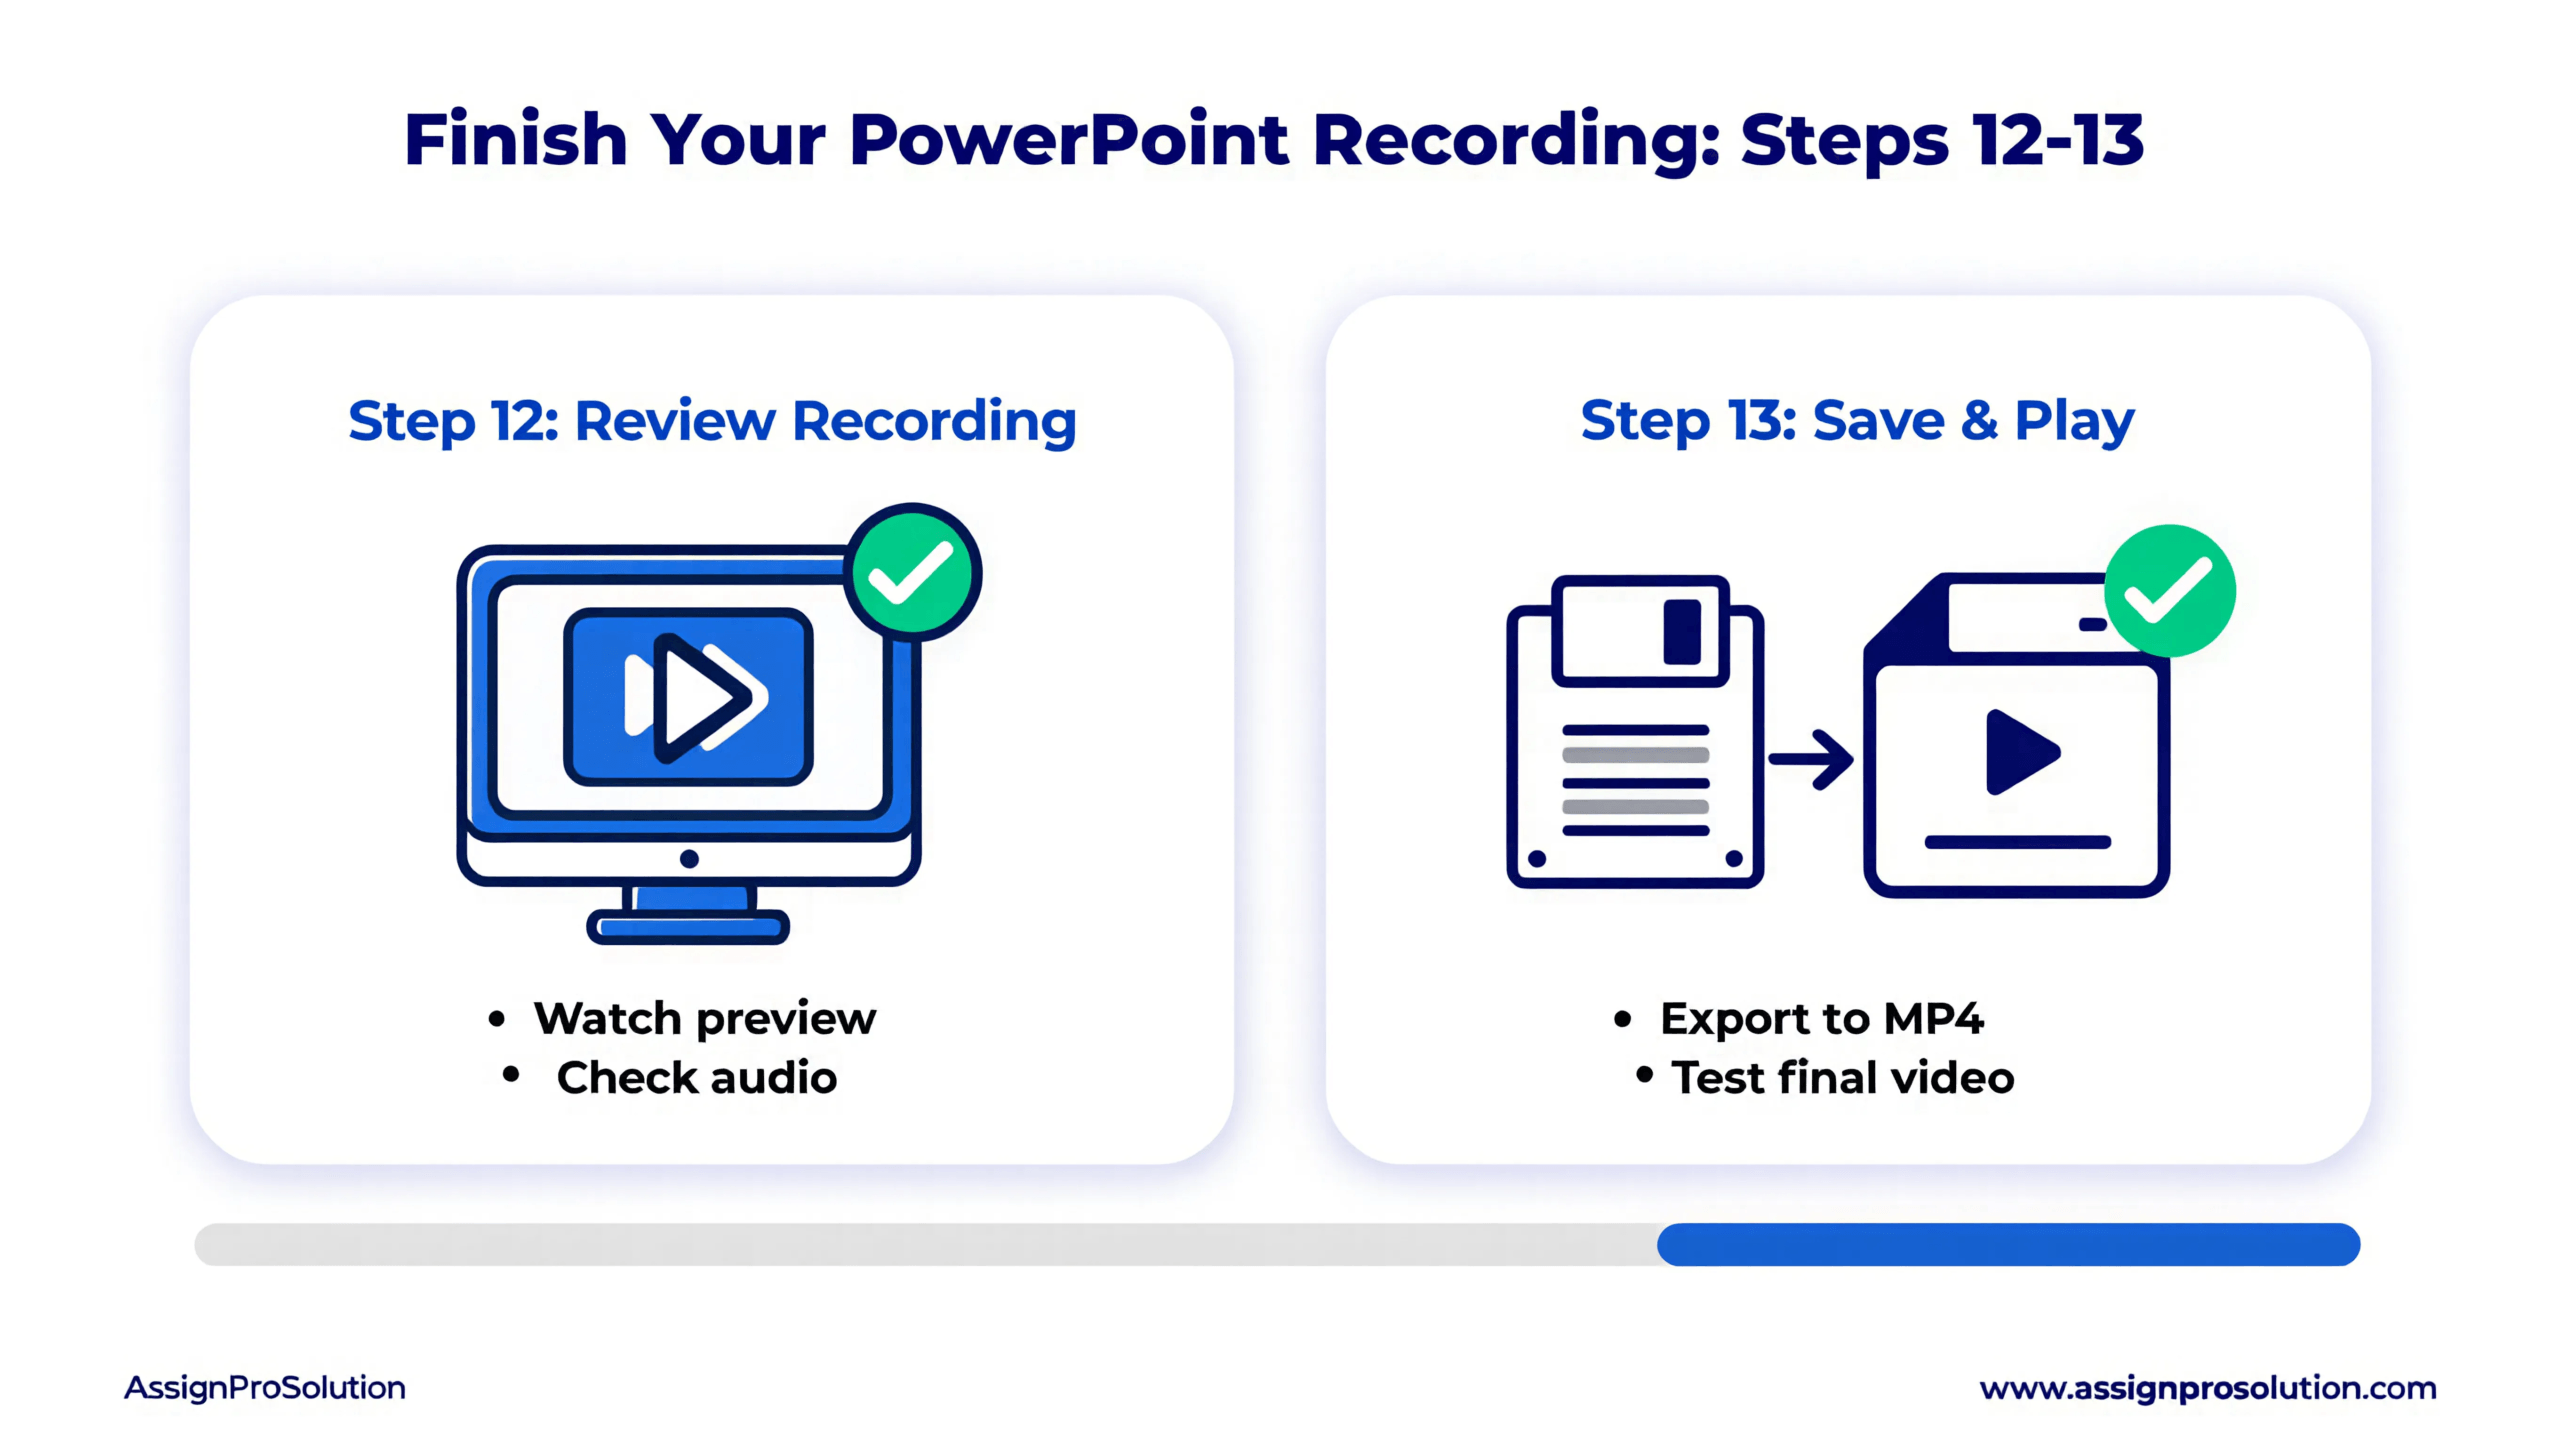
Click File → Save to preserve your work.
Your recording embeds directly into the PowerPoint file. The presentation now contains your video, audio, and original slides.
Save frequently. Unsaved recordings disappear if PowerPoint crashes.
How to Record Yourself in PowerPoint on Mac
Recording yourself in PowerPoint on Mac follows similar principles, but Apple’s system creates key differences.
Here’s how to record yourself in PowerPoint for university presentations on macOS.
5 Key Differences for Mac Users
Camera Permissions Required First
Before recording, grant PowerPoint camera access.
Navigate to: System Preferences → Security & Privacy → Privacy → Camera → Check Microsoft PowerPoint
Without this permission, your webcam won’t appear in the recording interface.
Microphone Permissions Separate
Grant microphone access through the same Security & Privacy menu.
Navigate to: System Preferences → Security & Privacy → Privacy → Microphone → Check Microsoft PowerPoint
Without this, PowerPoint can’t record narration in PowerPoint presentations.
Record Tab Location Identical
Good news — the Record tab appears in the same location on Mac.
Click it to access all recording tools. The interface mirrors Windows closely.
Preview Window Placement Differs Slightly
Mac versions may position the webcam preview differently by default.
Drag to reposition as needed. Bottom-right corner works best for most presentations.
Export Options Vary
Mac PowerPoint exports to MP4 through File → Export.
Quality options mirror Windows versions. Choose resolution based on your university’s file size limits.
Important Note for Mac Users
macOS handles screen recording permissions strictly. If recording fails, check System Preferences before troubleshooting other causes.
Apple’s security features protect privacy but require manual permission grants for each application.
For detailed Mac instructions on how to record video in PowerPoint, consult Microsoft’s official guide for Apple devices.
How to Record PowerPoint With Webcam and Slide at Same Time
Many students specifically search for how to record PowerPoint with face visible alongside slides. This section addresses that exact need.
PowerPoint’s built-in feature handles this automatically — but setup matters.
Step-by-Step for Webcam + Slide Recording
Step 1: Open your presentation and click the Record tab.
This activates all recording tools needed to capture both yourself and your slides.
Step 2: Click Record to enter recording mode.
PowerPoint switches to full-screen recording interface.
Step 3: Locate the camera icon in the toolbar.
Click to enable if disabled. The icon should appear solid (not crossed out).
Step 4: Your webcam preview appears as a floating window over your slides.
This preview shows exactly what viewers will see — your face overlaying the presentation.
Step 5: Position the preview window where it won’t block important slide content.
Bottom corners work best. Drag and resize as needed.
Step 6: Start recording.
PowerPoint captures both your webcam feed AND your slides simultaneously.
How It Works
The final recording shows your face in a picture-in-picture format overlaying your presentation.
This PowerPoint screen recording with webcam approach creates professional video presentations without external software.
Your webcam video remains visible throughout the entire presentation. Viewers see both your slides and your face simultaneously — exactly what universities require for assessed presentations.
Professional Tips
- Keep your face visible at all times — don’t minimize the webcam window
- Position yourself in corners to maximize slide visibility
- Maintain eye contact with the camera for natural engagement
- Test the layout before recording important presentations
Common Errors When Recording in PowerPoint — And How to Fix Them
Even when you know how to record yourself in PowerPoint, technical problems occur. Here’s how to solve the five most common issues.
Error 1: Webcam Not Showing in PowerPoint
Cause: Privacy settings block camera access, or another application uses the webcam.
Fix:
- Windows: Settings → Privacy → Camera → Allow apps to access camera → Enable for Desktop apps
- Close Zoom, Teams, Skype, or any video app before opening PowerPoint
- Restart PowerPoint after granting permissions
- Try unplugging and reconnecting external webcams
- Check Device Manager to ensure webcam drivers are installed and working
Error 2: No Audio in Recording
Cause: Wrong microphone selected, or microphone permissions denied.
Fix:
- Check Windows Sound Settings → Input → Ensure correct microphone selected
- Grant microphone permissions: Settings → Privacy → Microphone
- Test mic in Voice Recorder app first
- Check for physical mute switches on external microphones
- Verify volume levels aren’t set to zero
Error 3: Record Tab Missing
Cause: Outdated PowerPoint version or subscription expired.
Fix:
- Update PowerPoint: File → Account → Update Options → Update Now
- Verify Microsoft 365 subscription status
- PowerPoint Online (web version) has limited recording features — use desktop app
- PowerPoint 2013 and earlier lack the Record tab entirely — upgrade required
According to PCMag’s PowerPoint guide, the Record feature requires PowerPoint 2016 or newer for full functionality.
Error 4: Recording File Too Large to Submit
Cause: High-resolution recording creates massive files exceeding submission limits.
Fix:
- Export at lower resolution: File → Export → Create Video → Select “Standard” instead of “Ultra HD”
- Use video compression tools (HandBrake is free and effective)
- Split long presentations into multiple shorter recordings
- Check your university’s file size limits before recording
- Trim unnecessary content from beginning and end
Error 5: Recording Plays on My PC But Not University Computer
Cause: Missing codecs or incompatible file formats.
Fix:
- Export as MP4 (universally compatible) rather than keeping embedded PPTX format
- Avoid proprietary video codecs
- Test playback on a second device before submission
- Upload to YouTube (unlisted) and share link if file issues persist
- Use VLC Media Player to verify file integrity
Quick Troubleshooting Checklist
If you’re still experiencing issues with how to record yourself in PowerPoint:
- Restart your computer completely
- Update Windows/macOS to latest version
- Reinstall PowerPoint if problems persist
- Check antivirus settings (some block camera access)
- Try recording a single slide test before full presentation
How to Export and Submit Your PowerPoint Recording
Knowing how to record yourself in PowerPoint means nothing if you can’t submit correctly. Export format matters.
PPTX vs MP4: Which Should You Submit?
| Format | Best For | File Size | Compatibility |
| PPTX | Editable presentations, Microsoft ecosystem | Larger | Requires PowerPoint |
| MP4 | Video submissions, universal playback | Smaller (compressed) | Plays anywhere |
For most university submissions, export as MP4.
MP4 files play on any device without requiring PowerPoint installation. Universities prefer this format for consistent grading experiences.
How to Export as MP4
Step 1: Click File in the top menu.
Step 2: Select Export from the dropdown menu.
Step 3: Click Create a Video.
Step 4: Choose your quality setting:
- Ultra HD (4K) — Largest file, best quality (rarely needed)
- Full HD (1080p) — Recommended for clarity and reasonable size
- HD (720p) — Good balance for most submissions
- Standard (480p) — Smallest file, lower quality
Step 5: Click Create Video.
Step 6: Choose save location and enter filename.
Step 7: Click Save and wait for export.
Warning: Export may take several minutes for long recordings. Don’t close PowerPoint during this process.
University Submission Tips
- Check your module handbook for file format requirements before recording
- Most universities accept MP4 files under 500MB
- Name files correctly: StudentID_ModuleCode_Assignment (example: 12345678_BUS101_Presentation)
- Submit early to allow time for upload issues or resubmission
- Keep original PPTX file as backup in case you need edits
- Test playback on another device before final submission
- Verify file uploaded completely by downloading and playing after submission
File Size Reduction Tips
If your recording exceeds submission limits:
- Choose Standard (480p) quality during export
- Use free compression tools like HandBrake
- Split long presentations into two or three parts
- Remove unnecessary slides or trim recording length
- Compress using online tools like Clideo or Kapwing
What If Your University Requires PPTX Format?
Some professors want the original PowerPoint file with embedded recording.
To submit PPTX with embedded video:
- Simply save your presentation normally (File → Save)
- The recording embeds automatically within the file
- Verify file size doesn’t exceed limits
- Test by opening on another computer with PowerPoint installed
Students focused on scoring higher on university assignments always verify submission requirements before recording begins. Don’t assume — always check.
Tips to Look and Sound Professional on Camera
Recording yourself in PowerPoint captures exactly what your camera sees. Small adjustments dramatically improve quality.
Here’s how to look and sound professional in your university presentations.
Lighting
Good lighting transforms amateur recordings into professional presentations.
Best practices:
- Position light source in front of you, not behind
- Natural window light works excellently — face the window
- Avoid overhead-only lighting (creates shadows under eyes)
- Ring lights provide consistent, flattering illumination
- Use two light sources to eliminate harsh shadows
Pro Tip: Record during daytime near a window for free, natural lighting that looks professional.
Background
Your background affects viewer focus and professionalism.
Ideal backgrounds:
- Clean, uncluttered spaces
- Bookshelves (look academic and professional)
- Plain walls in neutral colors
- Organized desk setups
What to avoid:
- Windows behind you (creates silhouette effect)
- Messy rooms or unmade beds
- Distracting posters or decorations
- Busy patterns that draw attention away from you
Quick fix: Use PowerPoint’s blur background feature or virtual backgrounds if real backgrounds are messy.
Eye Contact Trick
Looking at your screen creates the impression you’re avoiding eye contact.
The solution:
- Look at your webcam lens, not your screen
- Place a sticky note arrow pointing to your camera as a reminder
- This creates genuine eye contact with viewers
- Practice before recording — it feels unnatural initially
Pro Tip: Position your notes or script just below your webcam. Your eyes stay near camera level while reading.
Speaking Pace
Most students speak too quickly when nervous.
Professional speaking techniques:
- Speak 10-20% slower than normal conversation
- Pause between major points for emphasis
- Avoid filler words (“um,” “like,” “basically,” “you know”)
- Record yourself practicing to identify speech habits
- Breathe naturally — don’t rush
University-specific tip: Professors appreciate clear, measured delivery. Slower speech demonstrates confidence and helps comprehension.
Body Language and Posture
Your posture affects how confident you appear.
Best practices:
- Sit up straight — don’t slouch
- Position camera at eye level (not looking up or down)
- Frame yourself from mid-chest up
- Keep hands visible if gesturing
- Smile naturally — it makes you appear approachable
Audio Quality
Clear audio matters more than video quality.
Improve your sound:
- Use headset microphones or external USB mics
- Record in quiet rooms — close doors and windows
- Silence phone notifications
- Turn off fans or air conditioning during recording
- Speak directly toward microphone
Dress Professionally
You don’t need formal attire, but appearance matters.
Recommendation:
- Wear what you’d wear to an in-person university presentation
- Solid colors work better than busy patterns on camera
- Avoid white (causes glare) and black (creates dark spots)
- University hoodie or polo shirt strikes good balance
AI-Powered Presentation Tools
Modern AI with PowerPoint features can enhance your recordings:
- Microsoft Copilot suggests content improvements and slide refinements
- Designer AI creates professional slide layouts automatically
- Speaker Coach analyzes your pacing, filler words, and delivery during rehearsal
- Transcription AI generates automatic captions for accessibility
- PowerPoint Cameo integrates your webcam seamlessly into slides
These AI tools help you record yourself in PowerPoint more effectively by improving both content quality and delivery confidence.
Practice Before Recording
Never record your final submission on the first attempt.
Practice routine:
- Do a complete dry run without recording
- Record a practice version and watch it fully
- Note what needs improvement
- Record final version with adjustments
This approach catches technical issues and delivery problems before they matter.
Frequently Asked Questions
Here are the most common questions students ask about how to record yourself in PowerPoint.
Q: How do I record myself in PowerPoint?
A: To record yourself in PowerPoint, click the Record tab, then click Record. Enable your webcam and microphone using the toggle icons. Click the red Record button to start, present your slides, then click Stop when finished. Your recording saves directly into the presentation file.
Q: Can I record my face and slides at the same time in PowerPoint?
A: Yes. PowerPoint’s Record feature captures your webcam, audio, and slides simultaneously. Your face appears as a picture-in-picture overlay while slides display in the background. This creates professional video presentations without additional software.
Q: Why is there no Record tab in my PowerPoint?
A: The Record tab requires PowerPoint 2016 or later. Older versions lack this feature. Update PowerPoint through File → Account → Update Options. Also verify your Microsoft 365 subscription is active. The web-based PowerPoint Online has limited recording capabilities compared to desktop versions.
Q: How do I record PowerPoint with webcam on Mac?
A: On Mac, first grant camera and microphone permissions through System Preferences → Security & Privacy. Then open PowerPoint, click the Record tab, and follow standard recording steps. Mac permissions must be enabled before PowerPoint can access your webcam and audio input.
Q: How do I add a video of myself to PowerPoint?
A: Two methods exist. First, use the built-in Record feature to capture yourself while presenting — this embeds video automatically. Second, pre-record a video separately, then insert it via Insert → Video → This Device. Position and resize the video on your slide as needed.
Q: How do I export a PowerPoint recording as MP4?
A: Click File → Export → Create a Video. Select your preferred quality (Full HD recommended). Click Create Video, choose a save location, and wait for export. This converts your PowerPoint recording with webcam and narration into a universally playable MP4 file suitable for university submission.
Q: Can I edit my recording after I finish?
A: Yes. You can re-record individual slides without redoing the entire presentation. Click the Record tab, select the slide you want to redo, and click Record again. You can also delete recordings from specific slides if needed.
Q: How long can my PowerPoint recording be?
A: PowerPoint has no strict time limit for recordings. However, longer recordings create larger files. Most universities prefer presentations between 5-15 minutes. Check your assignment brief for specific time requirements before recording.
Q: Why is my recording choppy or laggy?
A: Choppy recordings usually result from insufficient computer resources. Close all unnecessary programs before recording, ensure your laptop is plugged in, and consider recording at lower resolution. Updating your graphics drivers can also improve performance.
Q: Can I use PowerPoint recording for online university submissions?
A: Absolutely. PowerPoint recordings are ideal for university submissions in the UK, Australia, Canada, and globally. Export as MP4 for maximum compatibility with learning management systems like Blackboard, Moodle, or Canvas.
Conclusion
You now know exactly how to record yourself in PowerPoint — from initial setup through final university submission.
Let’s recap the essential steps:
- Verify your hardware (webcam, microphone) works properly
- Use PowerPoint 2016 or later with the full Record tab feature
- Enable both camera and microphone permissions before recording
- Position your webcam preview thoughtfully
- Record naturally, speaking directly to the camera
- Export as MP4 for universal compatibility
- Test playback on a second device before submission
Recording yourself in PowerPoint becomes second nature after your first successful attempt. Every university student masters this skill eventually — you just learned it faster than most.
Whether you’re completing video assessments, creating lecture content, or submitting recorded presentations, PowerPoint’s built-in tools handle everything you need. No expensive software required. No complicated third party apps.
We know university is stressful right now. Recorded presentations feel intimidating at first, but they are almost always easier than presenting live to a full lecture hall. Take it slow, follow the steps in this guide, and you will produce a professional recording your professor will appreciate.
Now close this guide and record your presentation. You’ve got this.
For more guidance on academic writing for university and presentation excellence, explore our other free student resources.
Need Help With Your University Presentation?
Creating recorded presentations, writing assignments, or preparing for assessments can feel overwhelming. You don’t have to figure everything out alone.
AssignPro Solution connects you with verified PhD and Master’s experts who provide professional presentation support, assignment guidance, and academic assistance tailored to your university’s requirements.
Whether you need help structuring content, polishing delivery, or meeting tight deadlines — expert support is one click away.